Showing posts with label papercraft. Show all posts

Wednesday, March 15, 2017

My first regiments for Morale Napoleon

A brief interlude from the MOTH games: I have been putting together some figures in preparation to play Morale Napoleon. These are the results:


All the figures are from Walkerloo Print-Fantry. The ones on the left are from the "Les Grognards: Old Guard Grenadiers" set, while the ones on the right are from the "Coldstream Guards" set. All of them were printed at 30% scale, resulting in figures that are 15mm tall (from foot to eye level), then placed in sets of 4 on 60mm x 20mm bases -- the standard for infantry battalions in Morale Napoleon.

I still have to try a few battles in MapTool to get a better feel of how many more stands I will need to play the game.

Saturday, January 30, 2016

Sci-fi settlements

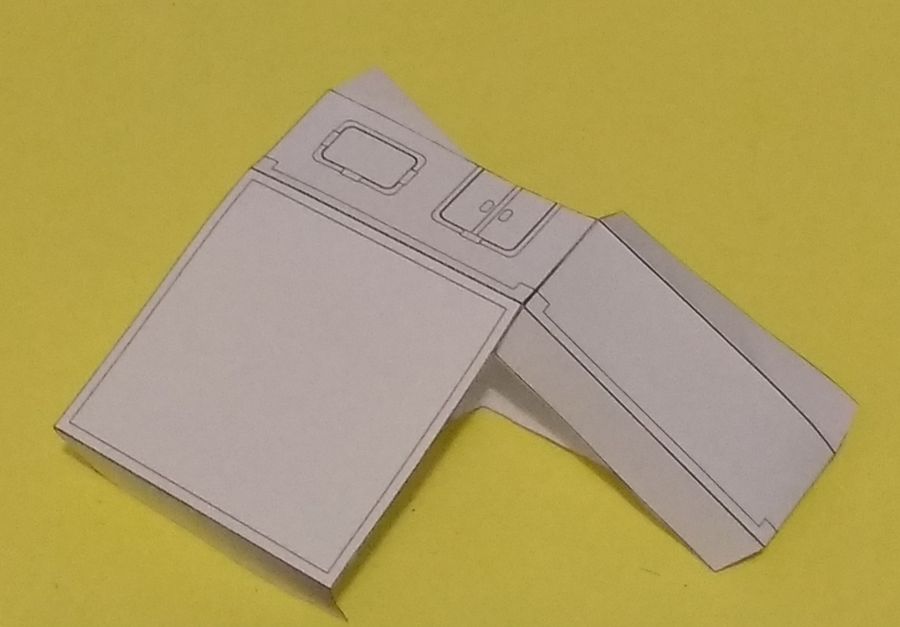
I created a few, simple sci-fi settlement buildings in 15mm scale to use in miniature games. Here is a link to the PDF file with uncolored and colored versions.
Low-resolution preview of the colored version
The buildings can be assembled as fold-flat or permanent structures. Not as simple as Toposolitario's Ikubes but still very handy. Each building is 75mm x 75mm x 30mm.


Here is a picture of a test build, along with some miniatures (15mm at eye level.)

"On the count of three..."

Saturday, January 2, 2016

Lots of tiny paper miniatures!

Here we go into 2016, wishing a happy year for all the visitors of this blog!

I picked up a number of miniature games during the holidays and I intend to post some battle reports and reviews soon. For now, here are some pictures of the miniatures I built to play Alien Squad Leader (at a reduced scale), Five Core Company Command and possibly other games.
Two full companies with three platoons each and a swarm of alien slashers.

Saturday, December 12, 2015

Some top-down tokens for sci-fi games

I have created some top-down tokens for sci-fi miniature games. They were made using basing conventions for Alien Squad Leader (thus 50mm square bases for infantry, 50mm x 100mm bases for the AFVs) but should be usable with other games.
Preview of the tokens: for now, just infantry and AFVs
A 300-dpi file in PDF format, with tokens in red and blue, can be downloaded from this link. This file is available under the Creative Commons Attribution 4.0 International license, e.g. you can share and remix but please give credit when doing so.

Tuesday, November 3, 2015

Painted paper starships

Previously I wrote about the paper starships I was building to play space games. Last weekend I finally painted and mounted them on stands.
The ships, made of thick cardstock, and stands made of toothpicks and foamcore.
I picked up two simple and contrasting color schemes, mostly for visibility on the table.
However, placing blue starships over a blue cutting mat was not the greatest idea.
And here are the results. The ships were glued to the stands with a mix of superglue and white glue.
The two small fleets ready to fight.
Now I am almost ready to play Full Thrust and other games. I just have to get a sheet or two of black cardstock to use as a playing area. I still need to flash, prime and then paint my metal starships too. However I am thinking of using blue-gray and green-gray color schemes on them.

Saturday, October 24, 2015

Laser (printed) Mechs

After a while, I came back to building 6mm Armor Grid miniatures. Following the suggestion from Wouter on the comments of my previous post on this subject, this time I colored them using color pencils. These are also scaled to 40% of the original size, but I printed both the uncolored and gray versions -- the gray ones give a nice, not too dark shading on a laser printer.
Left: uncolored (line art) painted green, right: gray (shaded) painted blue
The process of cutting, painting the edges black and building them was not hard, and the new models from the Mech Factory set are even easier to cut as the legs and torso come in separate parts.
Another view. These models stand about 3/4" tall
Up close, the shaded version looks better. From a distance, the line art-only version is brighter and thus, more readable. Even then, though, I would probably use the shaded version to build an army.

Hand-coloring paper miniatures takes away (at least part of) one of their advantages, but I was curious about how good or bad they would look. I am satisfied with these results, so I will probably keep trying this with other models and miniatures -- especially in 2mm, 6mm and 15mm scales.

Saturday, June 6, 2015

Paper and metal... in spaaace

I was surprised today by the arrival of an international mail package. I would expect it to be the French napoleonic miniatures that I got from Aleksandar's giveaway, Instead, they were the Full Thrust starter packs from Ground Zero Games. From previous experience (admittedly, a small sample) packages from Europe take from 1 to 3 months to arrive -- this time, it took about 20 days.

I also found out that my scratch-built ships were smaller than the GZG ones, so my frigates, destroyers and light cruisers have been turned into corvettes, frigates and destroyers.

Now I have to try and paint all of these ships to get them to the table. I am also looking for tips on mounting metal ships to the flight stands. I think at least some of them will require a bit of putty, as the hole in some of the ships is larger than the peg on the stands.

Saturday, May 16, 2015

Paper starships

Although I have recently ordered two Full Thrust starter kits from Ground Zero Games, I wanted to try my hand at making some paper, or otherwise scratch-built starships. Here are the results. The bases are made of black foamcore, the flight posts are toothpicks painted black. The ships on the left are made of folded paper, printed and colored with pencils. The two on the right are made with thick cardstock and toothpicks, and painted with acrylic paints.


Here are close ups of each set of ships. First the paper ones. I made the greenish one a while ago and posted it at the Cardboard Warriors forum. I made the other ones to try this other style but the result is quite fiddly to fold properly and to glue to the base.


And here are the scratch-built ones. These were cut without any previous planning. Based on the results, I intend to make a few templates so that I can have two squadrons to play. Even after I get the metal ones, I will probably still use them together.


Lastly, here is a shot of some movement and turn templates I made for Full Thrust, inspired by the maneuver tools from the X-Wing miniatures game. This are just a half disk with 30 degree increments and a straight rectangle with 1 and 1/2 inch increments.


Sunday, May 10, 2015

A bunch of other paper minis in 6mm scale

Today I went back to the project of using reduced Armor Grid miniatures, printed at 40% of their original size, as 6mm forces in games such as Strike Legion and 5150 Battalion Commander (previously I built some at 50% scale but 40% makes infantry size correct.)

I used the uncolored versions as I now have access only to a monochrome laser printer. I am still unsure if I will print them in colored paper or try to color them by hand.


Instead of assembling the infantry stands in a cross formation (which is mounted on an hexagonal base in Armor Grid), I simply folded each troop piece and glued them to a 1.5" x 0.5" base. For a command stand, I would use the original formation.


The light mechs were surprisingly easy to build, as I would only cut an approximate contour, while at the original scale I would spend a long time making every little cut precisely.


So this is it, any comments are welcome. I have some plans to run a short sci-fi campaign with some of these miniatures...

Wednesday, April 15, 2015

Another fold-flat scenario test

Here is yet another test for fold-flat terrain, in this case dungeons or sci-fi bases. The wall segments are simple two-sided strips with a folded base to hold the floor piece. Walls are conected by triangular posts, with small paper clips (in this 15mm scale version).

This is what the pieces look when taken apart:

Multiple rooms can be connected simply by adding more posts and walls. The main problem is finding a better way to fix the floor. Currently, it is held between the triangular posts and the folded pieces of the walls, but this is not very stable.

One alternative might be to simply have a large floor tile and place the entire set of walls above it, instead of having separate floor pieces for each room.

Friday, March 13, 2015

Adapting paper miniatures for plastic bases

Recently I saw a post (on a Facebook group about board game customization) about making custom Zombicide miniatures. Essentially, the idea is to add a regular sheet of paper in between the front and back of the miniature before cutting. It is a good idea to lightly brush each piece with a glue stick to prevent them from sliding while cutting. This produces a template in the exact shape of the cut mini, which can be glued to a piece of thick cardboard. After cutting it (and peeling off the template) you get three pieces: front, back and the cardboard filler.

In the original post, the resulting miniature was glued to a large coin, but I decided to try this technique to slot the miniature in a plastic base. It worked very well, the mini becomes very sturdy and can be easily removed from the base.

There is some extra work of cutting the thick cardboard, but I think it is worth it, especially for use in RPGs (or board games) with only a few miniatures. I think this could look good with either white or black edges, for 28mm miniatures.

Sunday, March 1, 2015

Origami Dice

This is not something new, but I only learned about it a few days ago as I looked for print and play games. How about creating custom dice made of origami parts? They are quite fun to make and also very sturdy. Here is the BoardgameGeek topic where I learned how to make them.

This seems to be a variant of the Sonobe modular origami units that are used to make many different shapes (here is another link showing how to build the modules.)

I have created templates for Five Core, as well as scatter and decision dice. They can be found in the downloads page. The templates were based on the blank template made by Daniel Ajoy and the images were obtained from openclipart.org.

Note: It is important to use thin paper to build these dice, as they require quite a bit of folding. I have found two approaches for assembling the six modules into the die:
1) Make an open box with five of the modules. Connect the tips of the tabs of remaining module and the box and slowly push them together.
2) Make two box pieces with three modules each, then connect them together.


Sunday, February 15, 2015

Tall Top-down Tokens

Today I have made another experiment with top-down tokens. It is nothing really new but I wanted to see what kind of result I could get with my monochrome laser printer.

The tokens are glued to a 2mm thick EVA ("foamies") sheet. I print out the tokens and also some templates to cut extra pieces and stack them to varying heights. This way, obstacles that grant cover are 1 layer tall, infantry uses 2 layers, vehicles use 3 layers and buildings are 4 layers tall (in the test building in the picture, there are additional bits glued on top of it.)

The result is not very fancy but the different heights are helpful in understanding what each piece is, and add some "three dimensional feel" to an otherwise flat board. I might make a portable set this way, only using black foam as green is a little distracting (especially on the buildings.)

Sunday, September 14, 2014

Crafting a set of 15mm zombie survival miniatures

I am in the process of coloring an updated set of zombie survival 15mm miniatures, based on the ones I made for the Grey City campaign. I have added some police miniatures and adjusted the scale, so that they are around 16.5mm from head to foot.
If all goes well, I should release them later this week...

Sunday, August 24, 2014

A zombie horde approaches!

Yesterday I built 60 zombies from various Darkmook survival horror sets. Some may be annoyed by the repeated poses but I think they still do their job well...


Now I have to set up some zombie survival games with these...

Sunday, August 17, 2014

My new batch of 15mm post-apocalyptic minis

I have finished my "new generation" of 15mm paper minis (actually, some of them are a bit taller than that...) They took a while to make but I find the results really good:


They were printed at a photo print shop, thus the very bright colors and great details. To paint over white bits on the photo paper, I used a Sakura Identi-Pen. I have tried other similar pens but this is the one I have found to stick really well to that paper.


The bases were cut with a craft paper punch, 11/16" or roughly 17mm. I cut one circle of a texture sheet -- printed at home, as the glue I use does not take well on photo paper -- and one circle of a thin EVA sheet (also known as "foamies") then glued them together.


Also thanks to Sean for making some interesting posts about miniature photography. There is not so much I can do with a point and shoot camera and improvised lighting, but I think these pictures are already better than previous ones taken with the camera flash (or without flash and some fudging in Gimp.)

Monday, July 28, 2014

Looking for medicine in a zombie-infested town

Recently I bought the I, Zombie supplement for All Things Zombie (ATZ) and this made me want to play more zombie survival adventures.

I never gave much attention to tri-fold or trigonal paper minis. This changed after I saw a very nice All Things Zombie battle report. I found interesting that the tri-folds were very visible and distinguishable on the table. So instead of printing another batch of the zombies and survivors I created for my Grey City campaign, I decided to try the tri-fold ones from the War of the Dead: the Paper Dead set from Daring Entertainment.

In this scenario, Barry [rep 5 star survivor with SMG] and Moe [rep 4 grunt survivor with rifle] must reach the building at the other end of the board, search for some medicine [pass a challenge test] and leave through the edge they entered. Here is a picture of the board at the beginning, already with the initial zombie placement [I rolled 7 zombies, placed per the rules.]


Saturday, July 26, 2014

My current terrain inventory

After deciding to stick with 15mm scale terrain, I spent some time in the last few days organizing what I had and building some additional pieces.

Here is the terrain I currently have. Most of it fits in a storage box (38cm x 24cm x 18cm) and some older, simpler buildings and tiles are stored in a plastic folder.


So, what exactly is in the box? Plenty of stuff, useful for modern, post-apocalyptic and sci-fi gaming.

First, there are 10 flat-folding buildings based on WorldWorks Games swift scenics line, more specifically the office and abandoned buildings.

Friday, July 25, 2014

Desert Skiff built at 15mm scale

Here are some pictures of the desert skiff printed at 50% scale, to play with 15mm miniatures:


The miniatures are from Slick's Minis and Spacejacker. Expect a battle report soon using this model...


This reduced model was printed on regular 90g/cm2 paper. There were no major problems making the cuts and folds at 50% scale but I really recommend trimming the tabs marked with an "X" before folding and gluing the double-sided parts. This avoid double-thickness tabs that will be harder to fold properly.


Normally I would apply a black pen to the edges of the pieces but in this case, as I cut them I felt that leaving the white edges contributed to the rough/worn look that I wanted.

Thursday, July 24, 2014

Desert Skiff 3D Model

I have finished texturing the Desert Skiff 3D model in 28mm scale. It requires printing five pages although one is optional, with the "floating" base. Here is a low-resolution preview of the parts:


You can download PDF files from these links for Letter-sized or A4-sized pages.